Pastikan anda telah mengikuti Siri Tabarra 1 - 10 sebelum anda
membaca
dan memahami Tabarra 11.... Jika belum sila hubungi penghantar siri
ini
*********************************************************************
***
*********************************************************************
***
Riwayat ketiga ini menunjukkan dengan seterang-terangnya kepada
kita hakikat pereka-perekanya. Siapakah mereka dan apakah sebenarnya
motif yang mendorong mereka mencipta cerita-cerita yang seperti ini.
Hasil analisa kita terhadap cerita ini menampilkan beberapa
kesimpulan
seperti berikut:-
1. Maksud mereka bukan sekadar melakukan Tabarra terhadap
Saidina Umar dan keluarga beliau tetapi juga melalui beberapa
perkataan
yang terdapat di dalamnya mereka juga melakukan TAbarra terhadap
Rasulullah dengan menyerang Baginda dengan serangan yang halus.
tetapi
sangat tajam. Oleh kerana mereka juga tidak percaya kepada Quran
yang ada
ini maka mereka mempersenda-sendakan orang yang membaca Al Quran,
seolah-olah Al Quran yang ada ini tidak dapat membuahkan apa-apa budi
bekerti yang baik dalam diri pembaca-pembacanya. Lihatlah kepada Abu
Syahmah yang senantiasa asyik membaca Al Quran. Apakah hasil yang
diperolehinya daripada pembacaan Al Quran ini? Tidak lain hanyalah
perlakuan keji yang telah menyeretnya menerima hukuman hudud hingga
mati!!
2. Paling mendukacitakan ialah pereka-pereka cerita ini tidak
mengetahui bahawa Abu Syahmah bukannya kuniah (nama samaran)
Ubaidullah.
Sekiranyanya mereka berkeras mengatakan Abu Syahmah ialah kuniah
Ubaidullah maka sikap itu merupakan bukti paling besar tentang
pendustaan
mereka. Sebabbya Ubaidullah bin Umar terus hidup sampai kepada
peperangan
Siffin dan dalam peperangan itu beliau syahid di pihak Muawiyyah.
semua
ahli sejarah termasuk ahli sejarah dari kalangan Syiah mengatakan
bila
Saidina Umar terbunuh syahid maka Ubaidullah terus membunuh Hurmuzan
yang
dianggap bersyubahat dalam pembunuhan Saidina Umar. Kes pembunuhan
itu
merupakan kes pertama yang dihadapi oleh Saidina Othman setelah
beliau
dilantik menjadi Khalifah. Adakah Ubaidullah telah hidup kembali
setelah
menerima hukuman had seperti yang tersebut dalam kisah yang sedang
kita
bicarakan ini.? Atau musih ISlam itu tidak nampak sesuatu yang lain
selain hasrat mereka untuk memburuk-burukkan Saidina Umar serta
keluarganya dan dalam kekalutan memburu hasrat itu mereka tidak sedar
siapa yang hidup dan siapa pula yang mati.?
3. Nabiz itu sendiri asalnya bukanlah sesuatu yang haram kecuali
kalau ia memabukkan. Dan ia tidak memabukkan melainkan selepas 3/4
hari
(diperam). Kenapakah golongan pereka-pereka cerita palsu yang bodoh
ini
telah menganggap setiap nabiz memabukkan. Dalam riwayat yang pertama
sebelum ini telah kita lihat bagaimana dengan jelas mereka menuduh
Abu
Syahmah meminum arak (khamar) sedangkan di sini lain pula ceritanya.
4. Riwayat ini membuktikan bahawa wanita yang denganya Abu
Syahmah melakukan perzinaan itu adalah perempuan (Imraah) yang
memberi
erti seorang yang sudah berkahwin. Soalnya kenapakah perempuan itu
menyembunyikan sampai begitu lama perkara yang mencemarkan
kehormatannya
sehingga melahirkan anak. Sebenarnya bagi seorang perempuan yang
sudah
berkahwin melahirkan anak bukan satu perkara pelik. Apa buktinya
anak itu
bukan anak suaminya.? Dakwaaannya semata-mata tidak boleh dijadikan
kerana bukti dan dalil itu adalah sesuatu yang lain daripada dakwaan
Bahkan kita sependapat diamnya perempuan itu selama 9 bulan merupakan
sebesar-besar bukti pembohongannya.
5. seperti sama -sama telah kita maklum kisah ini telah
diriwayatkan melalui 3 jalan. tetapi tidak disebutkan pada mana-mana
jalan riwayat tentang perempuan tersebut, orang arabkah atau Yahudi
atau
perempuan itu sengaja dibawa datang dari Persia untuk menyiapkan
cerita
ini?!!!
********* UMAR MEMUKUL ABDUL RAHMAN*************************
Sebenarnya Abu Syahmah itu bukanlah kuniah Ubaidullah tetapi
kuniah Abdul Rahman Al Ausath, iaitu salah seorang anak Saidina Umar.
Kisah sebenarnya sejauh yang diterima oleh ulama pengkaji Hadith
tidak
lebih dari yang disebutkan oleh mereka bahawa pernah Abdul Rahman Al
Ausath mengikuti Amar bin Al Asy ra dalam satu angkatan jihad di
Mesir.
Pada suatu hari, beliau meminum nabiz dan kebetulannya beliau mabuk.
Pada
pagi keesokannya beliau pergi menemui Amar bin Al Asy meminta supaya
melakukan had ke atasnya. Akan tetapi Amar bin Al Asy enggan
melaksanakan
justeru beliau tidak mendapati langsung kesan-kesan mabuk padanya dan
tiada pula saksi yang menyaksikan (selain daripada keyakinannya yang
berasaskan pendapat bahawa bukan semua nabiz itu memabukkan dan Abu
Syahmah atau Abdul Rahman pula tidak meminumnya dengan kesedaran
bahawa
nabiz itu sudah memabukkan). Abdul Rahman pun berkata, " Kalau engkau
tidak melaksanakan hukuman ke atasku, aku akan mengadukan perkara ini
kepada ayahku". Dengan terpaksa 'Amr bin Al ASy pun melaksanakan
hukuman
had ke atasnya di dalam khemahnya sampai tidak diketahui oleh
sesiapapun.
Kemudian Saidina Umar mendapat tahu perkata itu, beliau menegur 'Amr
Al
Asy dengan berkata," Kenapakah engkau tidak menjalankan hukuman itu
di
hadapan khalayak ramai malah sebaliknya engkau sembunyikan
perlaksanaannya?" tatkala Abdul Rahman pulang ke MAdinah berikutan
kemenangan yang dicapai oleh orang Islam di Mesir maka Saidina Umar
memukul Abdul Rahman sebagai ta'dib (membentuk adab) dan tarbiyyah
(pendidikan). Secara kebetulan beberapa hari kemudian Abdul Rahman
jatuh
sakit dan sakitnya itu rupa-rupanya membawa beliau menemui ajalnya.
Selepas mengemukakan cerita ini Imam Ibnu Al Jauzi dan As Suyuti
menulis bahawa, " Sekadar inilah asalnya cerita ini tetapi ahli-ahli
cerita telah menokok tambahnya sehingga menjadi satu cerita yang
tersendiri pula" (Al Maudhu'at jilid 3 ms 275, Al la Ali'u Al
Masnu'ah
jilid 2 ms 198)
***** Kesimpulannya,
Pereka cipta cerita ini merupakah pekerjaan orang majusi atau
yahudi atau golongan yang menggabungkan kedua sifat ini yang mengaku
bahawa mereka mempunyai para Imam yang mengetahui hal yang ghaib.
Mereka
ini menaruh dendam kasumat kepada Saidina Umar dan keluarganya yang
telah
menjatuhkan empayar mereka. walaupun begitu mereka tetap bercanggah
pendapat dalam menunjukkan pula kepalsuan cerita-cerita mereka itu.
Wassalammualaikum
Tulisan itu adalah ditulis Oleh Ustaz MUhammad Asri di dalam Majalah
Al
Mustaqim
How to Install Ubuntu 16.10/16.04 Alongside With Windows 10 or 8 in Dual-Boot
Download Your Free eBooks NOW - 10 Free Linux eBooks for Administrators | 4 Free Shell Scripting eBooks
Ubuntu 16.10 released with a support of 9 months until July 2017 and Ubuntu 16.04 has been released in wild by Canonical with a life circle of 5 years support.
This tutorial will guide you on how you can perform the installation of Ubuntu 16.10 and Ubuntu 16.04 in dual-boot with a Microsoft Operating System on machines that come pre-installed with Windows 10.
In case your hardware uses UEFI then you should modify the EFI settings and disable Secure Boot feature.
If your computer has no other Operating System already installed and you plan to use a Windows variant alongside Ubuntu 16.04/16.10, you should first install Microsoft Windows and then proceed with Ubuntu 16.04 installation.
In this particular case, on Windows installation steps, when formatting the hard disk, you should allocate a free space on the disk with at least 20 GB in size in order use it later as a partition for Ubuntu installation.
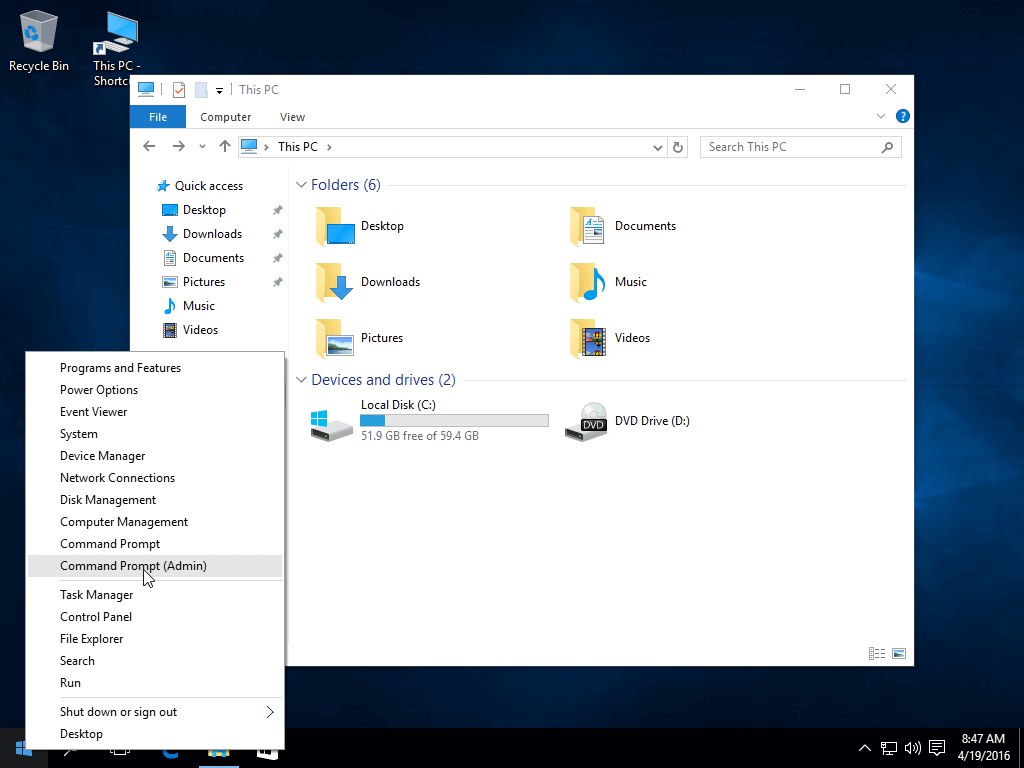
Login to your Windows machine with an administrative account and right click on the Start Menu -> Command Prompt (Admin) in order to enter Windows Command Line.
2. Once in CLI, type
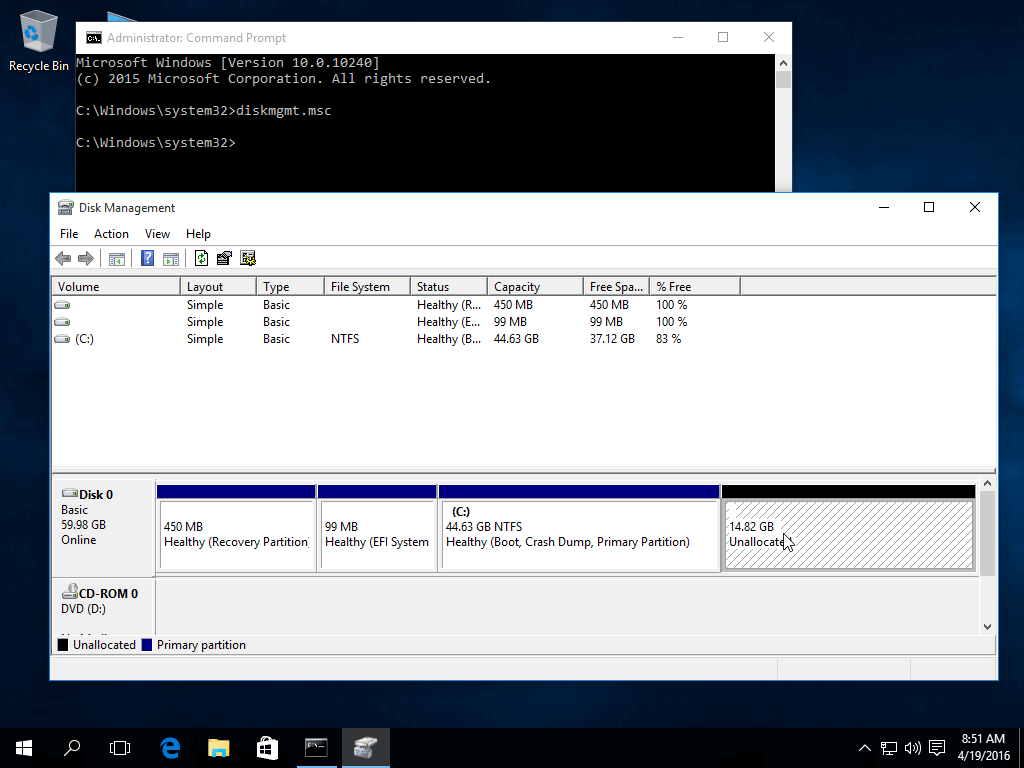
Once the space has been resized you will see a new unallocated space on the hard drive. Leave it as default and reboot the computer in order to proceed with Ubuntu 16.04 installation.
Burn the image to a DVD or create a bootable USB stick using a utility such as Universal USB Installer (BIOS compatible) or Rufus (UEFI compatible).
Place the USB stick or DVD in the appropriate drive, reboot the machine and instruct the BIOS/UEFI to boot-up from the DVD/USB by pressing a special function key (usually F12, F10 or F2 depending on the vendor specifications).
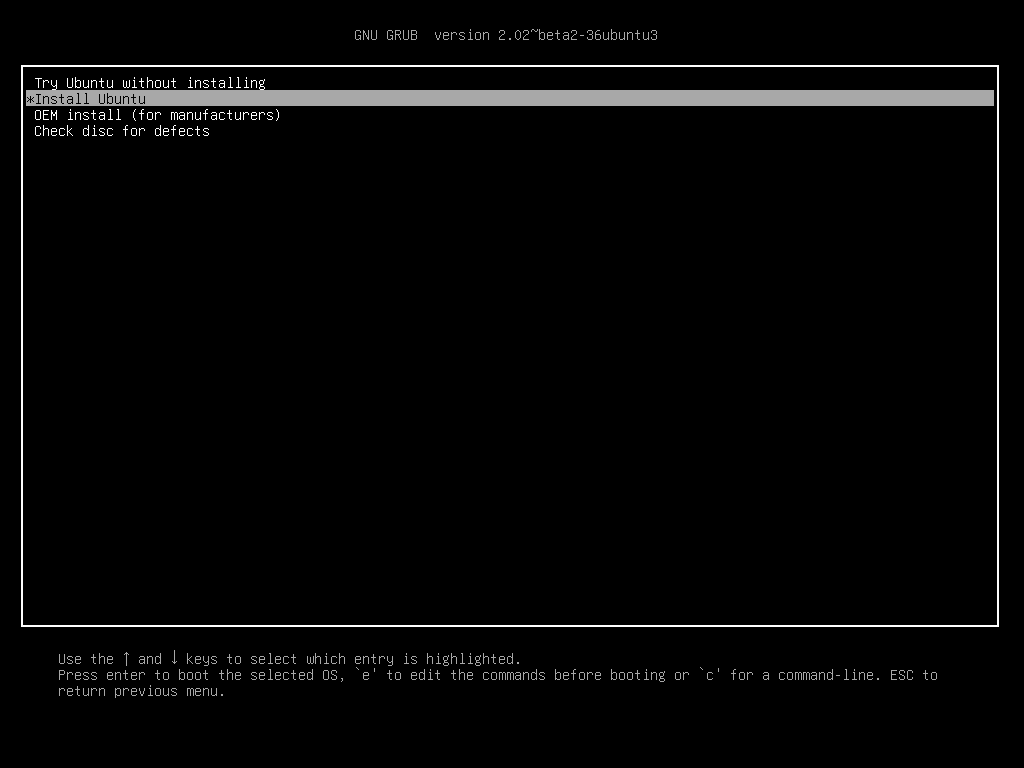
Once the media boot-up a new grub screen should appear on your monitor. From the menu select Install Ubuntu and hit Enter to continue.
5. After the boot media finishes loading into RAM you will end-up with a completely functional Ubuntu system running in live-mode.
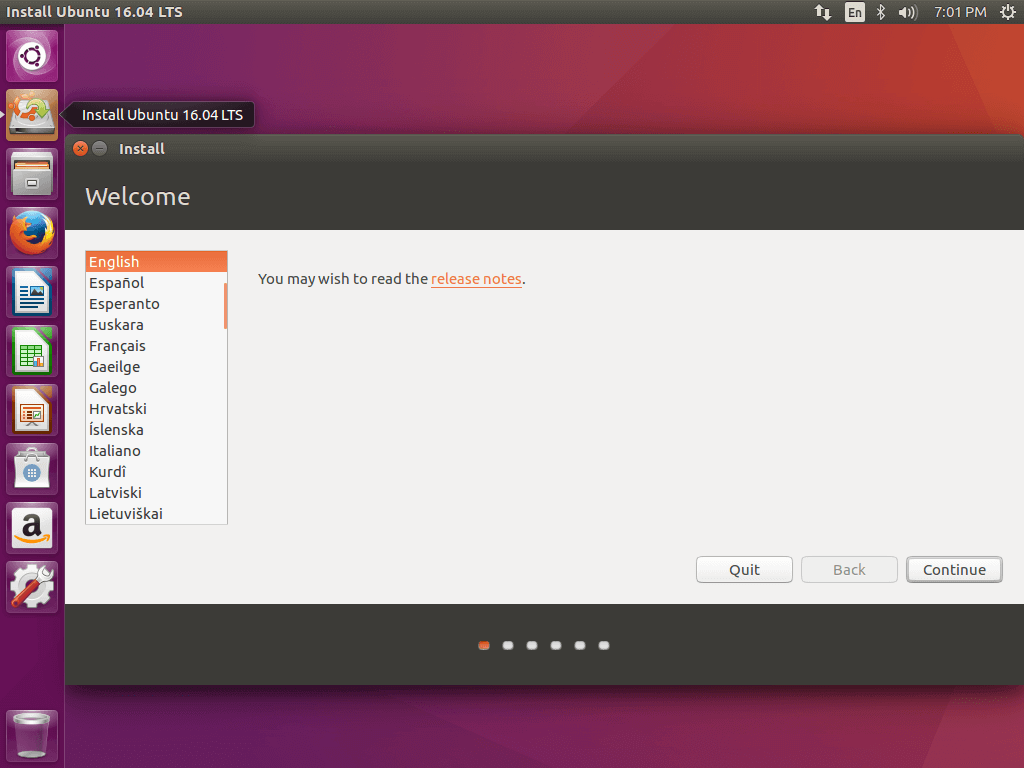
On the Launcher hit on the second icon from top, Install Ubuntu 16.04 LTS, and the installer utility will start. Choose the language you wish to perform the installation and click on Continue button to proceed further.
6. Next, leave both options from Preparing to Install Ubuntu unchecked and hit on Continue button again.
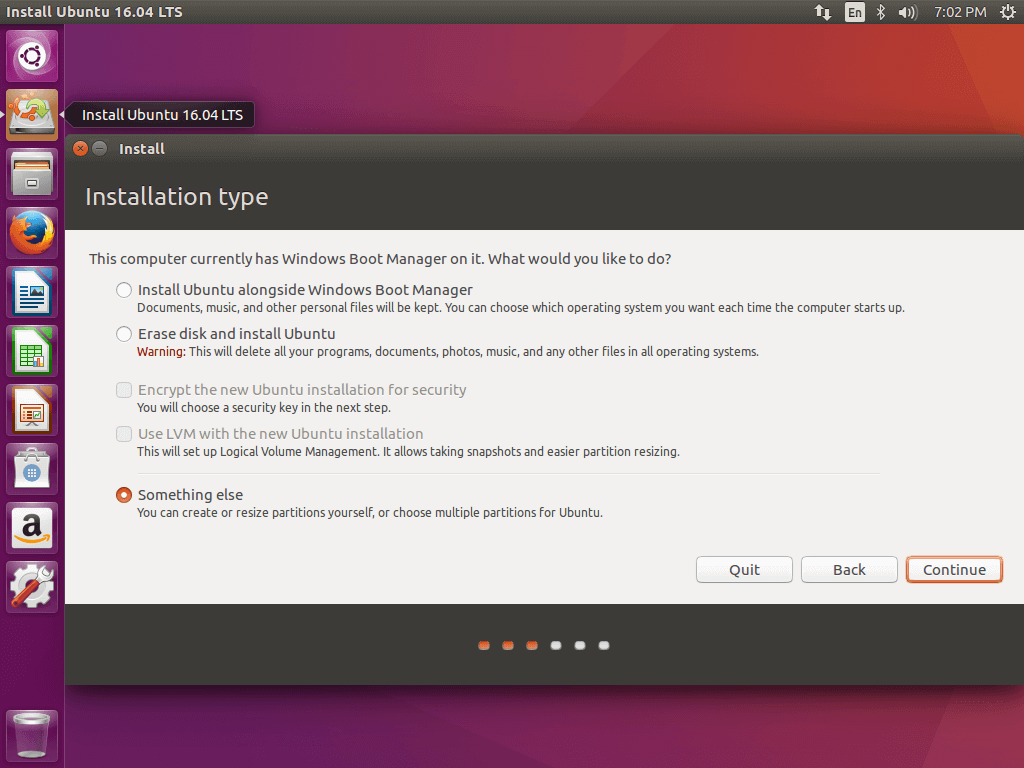
7. Now it’s time to select an Installation Type. You can choose to Install Ubuntu alongside Windows Boot Manager, option that will automatically take care of all the partition steps.
Use this option if you don’t require personalized partition scheme. In case you want a custom partition layout, check the Something else option and hit on Continue button to proceed further.
The option Erase disk and install Ubuntu should be avoided on dual-boot because is potentially dangerous and will wipe out your disk.
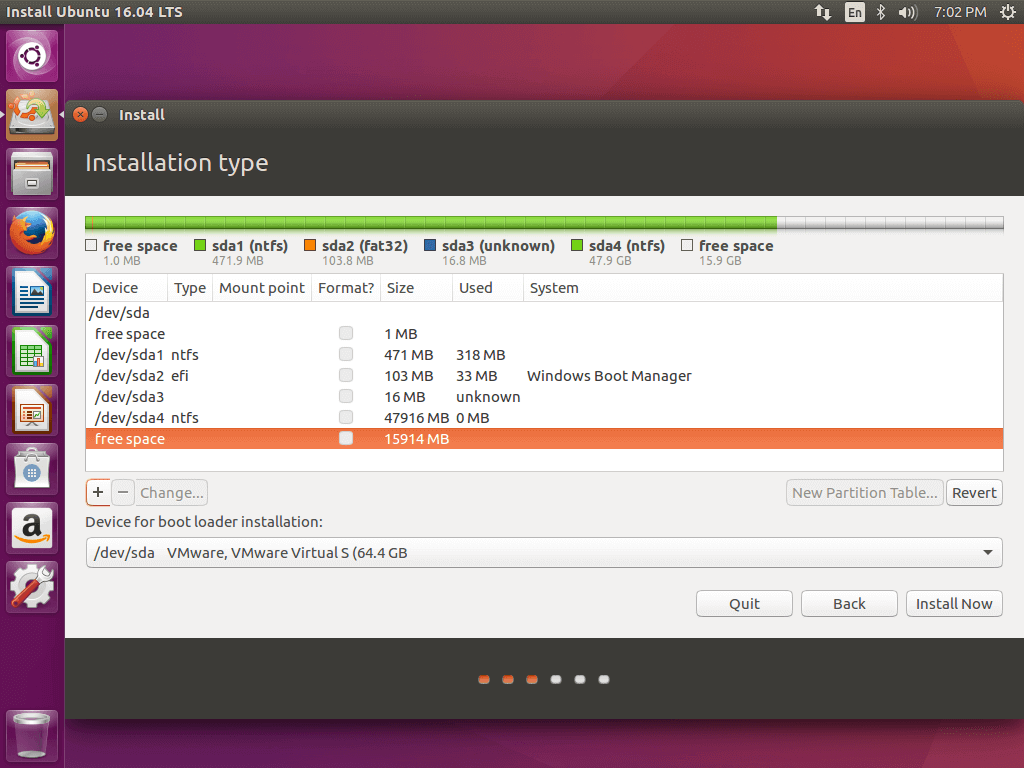
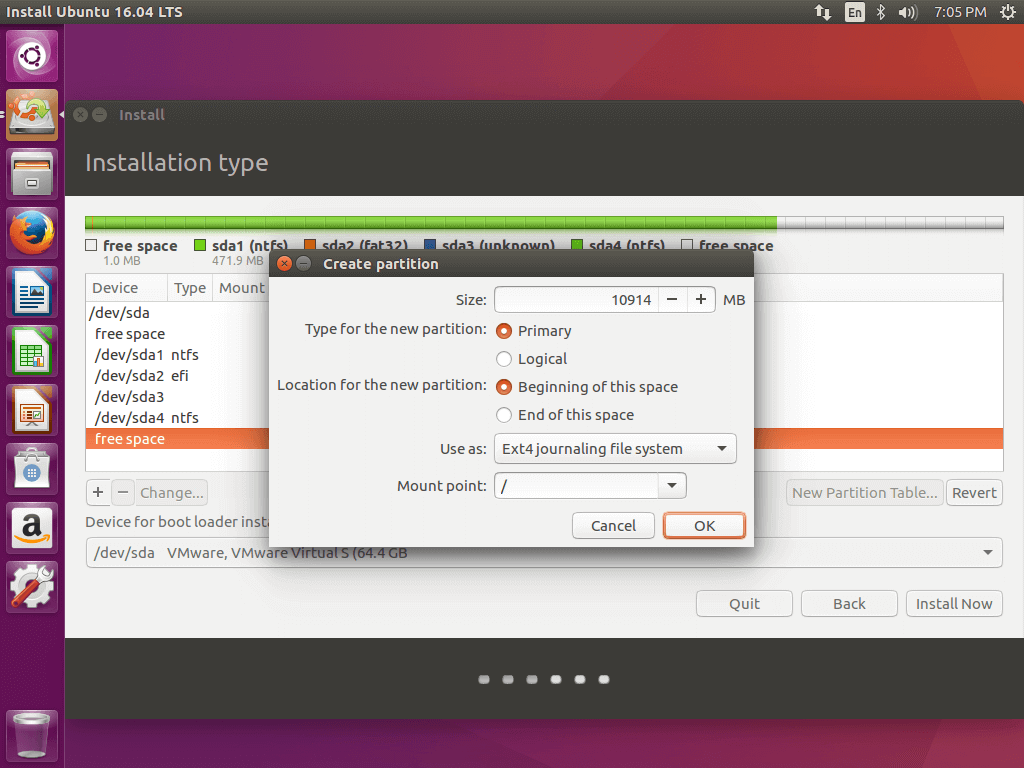
8. On this step we’ll create our custom partition layout for Ubuntu 16.04. On this guide will recommend that you create two partitions, one for
To create the first partition, the
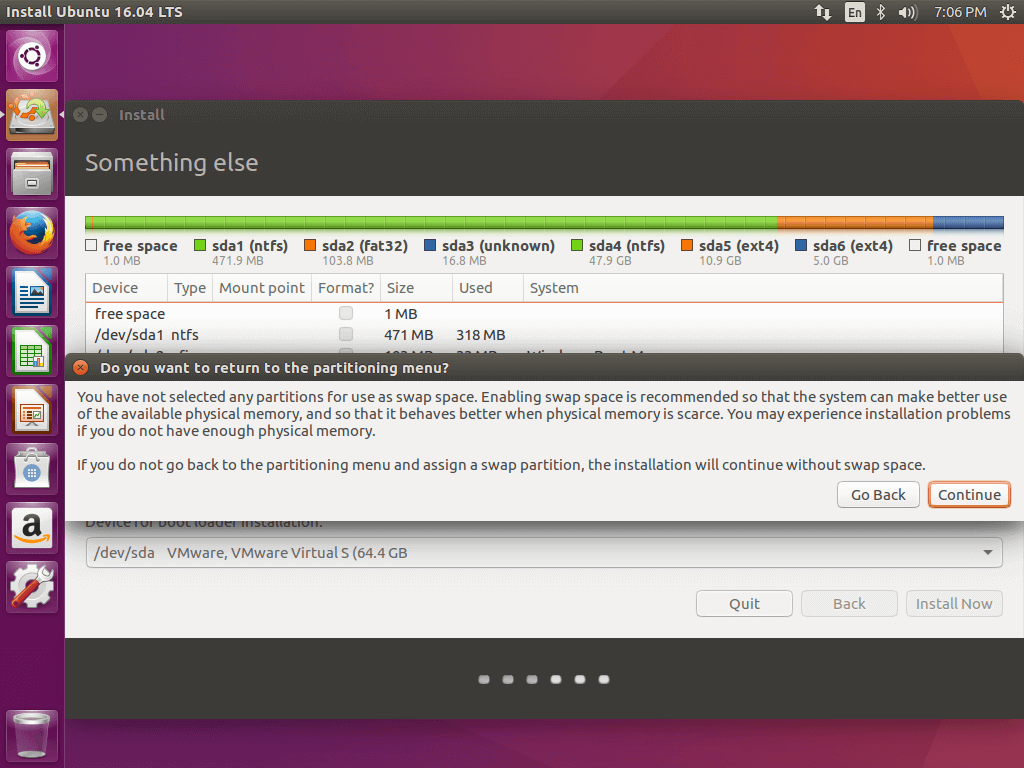
A pop-up window should appear to inform you about swap space. Ignore the alert by pressing on Continue button.
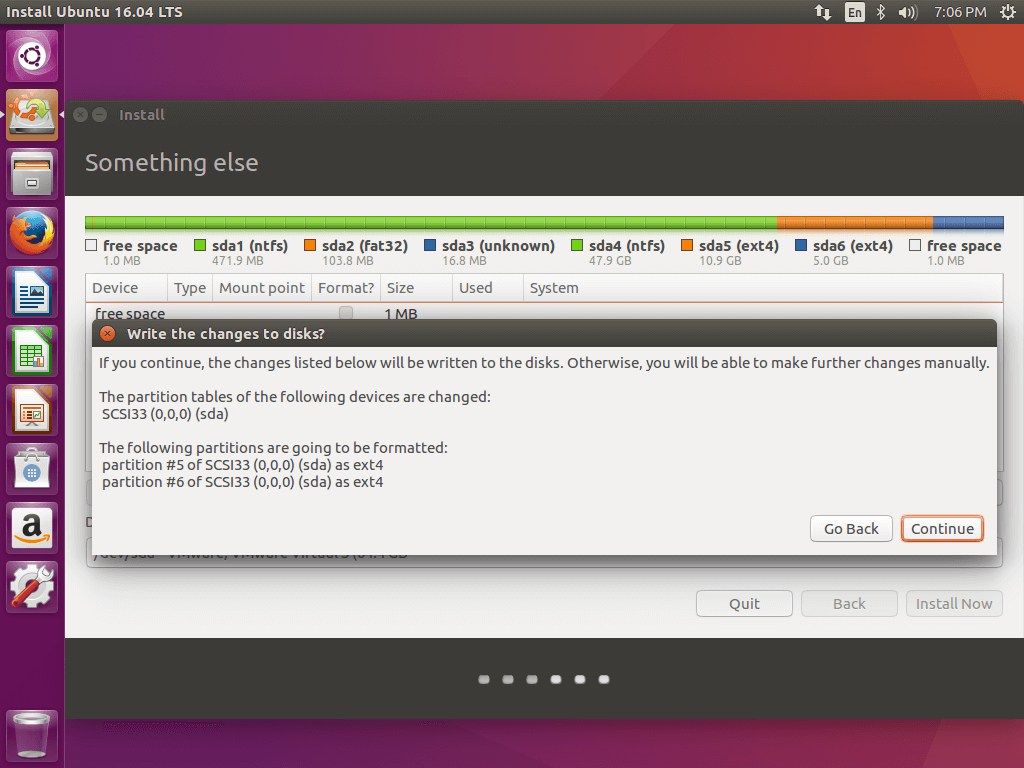
Next a new pop-up window will ask you if you agree with committing changes to disk. Hit Continue to write changes to disk and the installation process will now start.
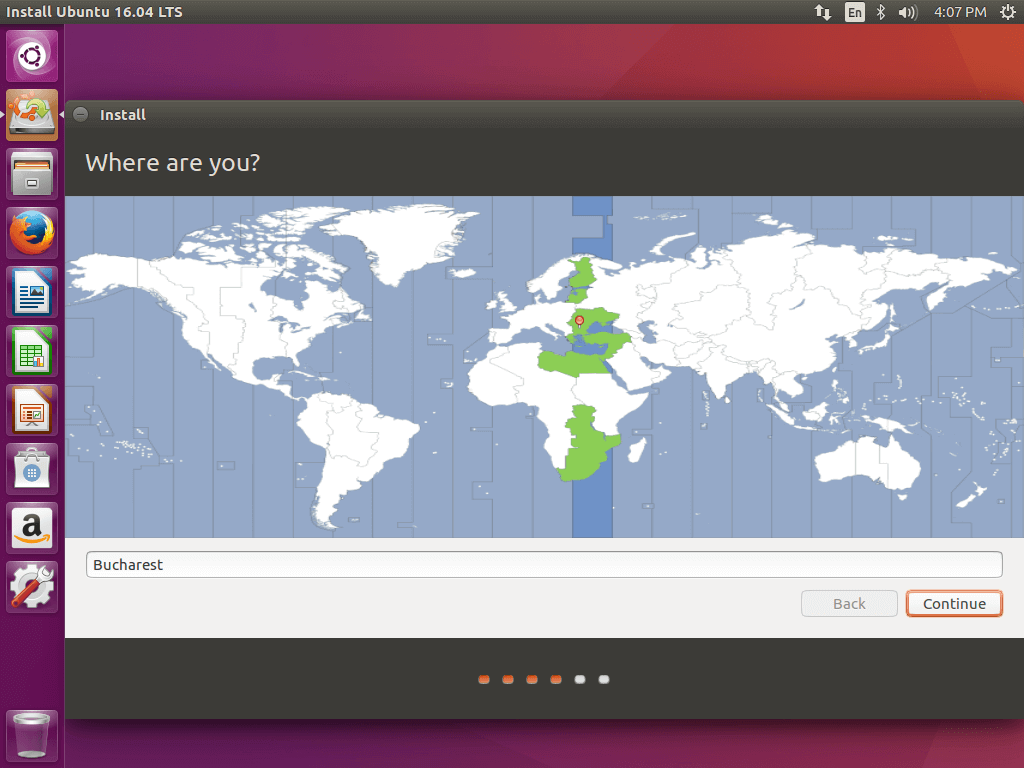
10. On the next screen adjust your machine physical location by selecting a city nearby from the map. When done hit Continue to move ahead.
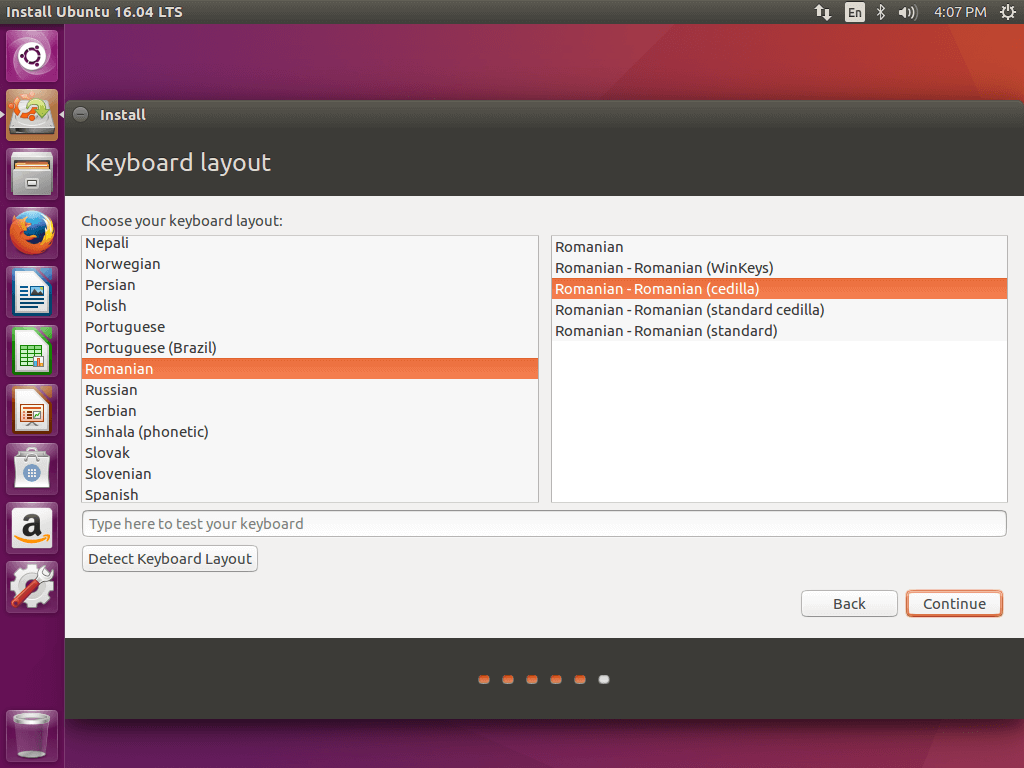
11. Next, select your keyboard layout and click on Continue button.
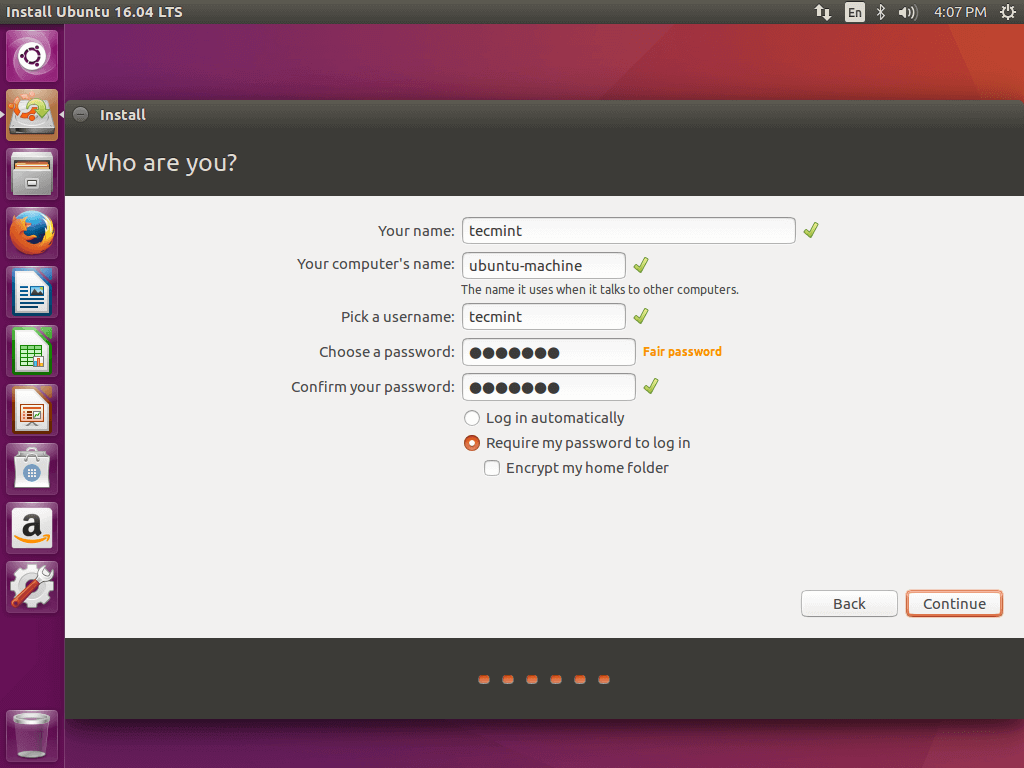
12. Pick up a username and password for your administrative sudo account, enter a descriptive name for your computer and hit Continue to finalize the installation.
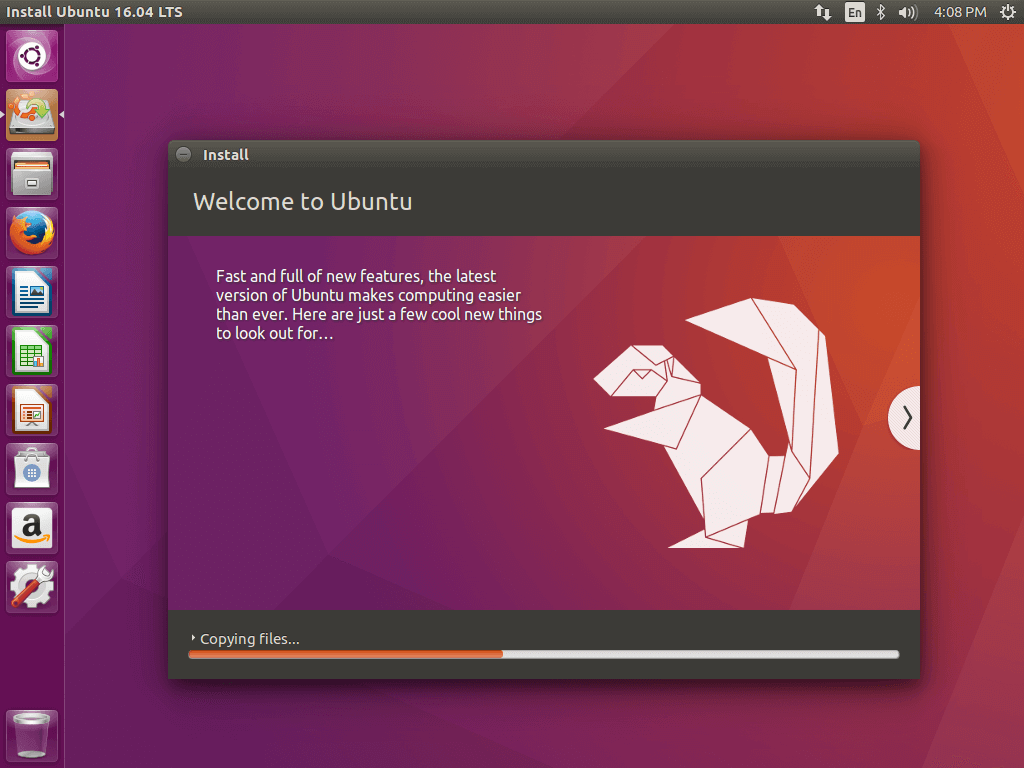
This are all the settings required for customizing Ubuntu 16.04 installation. From here on the installation process will run automatically until it reaches the end.
13. After the installation process reaches its end hit on Restart Now button in order to complete the installation.
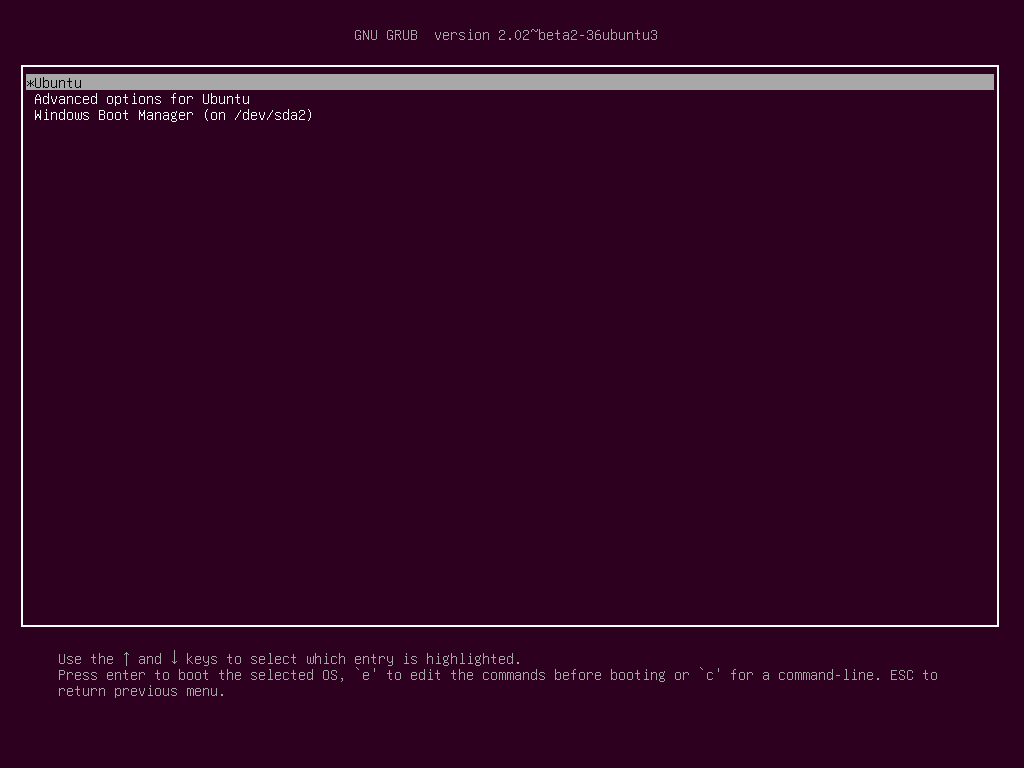
The machine will reboot into the Grub menu, where for ten seconds, you will be presented to choose what OS you wish to use further: Ubuntu 16.04 or Microsoft Windows.
Ubuntu is designated as default OS to boot from. Thus, just press Enter key or wait for those 10 seconds timeout to drain.
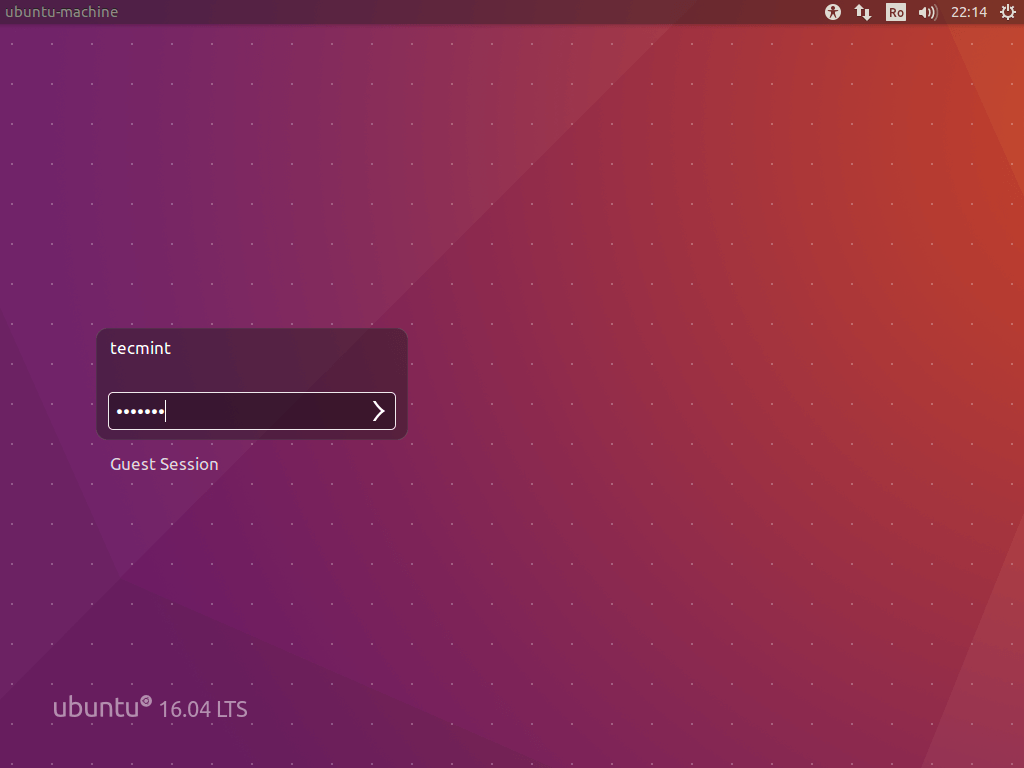
14. After Ubuntu finishes loading, login with the credentials created during the installation process and enjoy it. Ubuntu 16.04 provides NTFS file system support automatically so you can access the files from Windows partitions just by clicking on the Windows volume.
That’s it! In case you need to switch back to Windows, just reboot the computer and select Windows from the Grub menu.
If you want to install some additional software packages and customize Ubuntu 16.04, then read our article Top 7 Things to Do After Ubuntu 16.04 Installation.
This tutorial will guide you on how you can perform the installation of Ubuntu 16.10 and Ubuntu 16.04 in dual-boot with a Microsoft Operating System on machines that come pre-installed with Windows 10.
For fresh Ubuntu 16.04/16.10 installation, read our article about Ubuntu 16.04 Desktop Installation Guide and Ubuntu 16.10 Installation Guide
This guide assumes that your machine comes pre-installed with Windows 10 OS or an older version of Microsoft Windows, such as Windows 8.1 or 8. In case your hardware uses UEFI then you should modify the EFI settings and disable Secure Boot feature.
In this particular case, on Windows installation steps, when formatting the hard disk, you should allocate a free space on the disk with at least 20 GB in size in order use it later as a partition for Ubuntu installation.
Requirements
Download Ubuntu 16.04 and Ubuntu 16.10 ISO Image as per your system architecture using following link:Step 1: Prepare Windows Machine for Dual-Boot
1. The first thing you need to take care is to create a free space on the computer hard disk in case the system is installed on a single partition.Login to your Windows machine with an administrative account and right click on the Start Menu -> Command Prompt (Admin) in order to enter Windows Command Line.
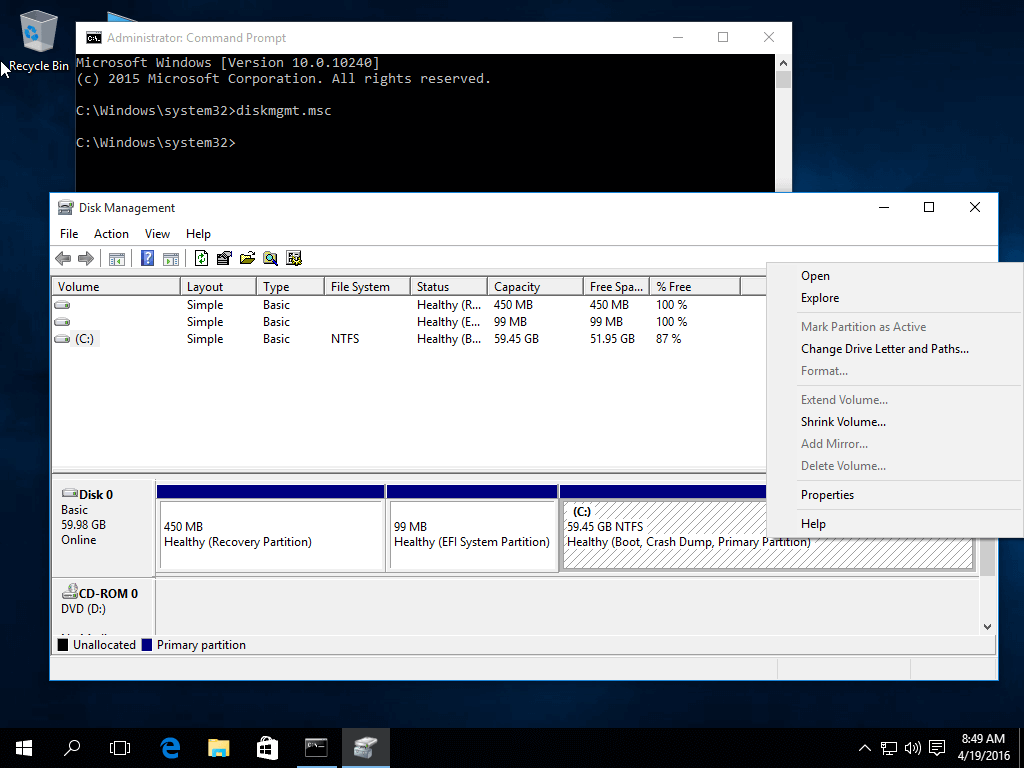
2. Once in CLI, type
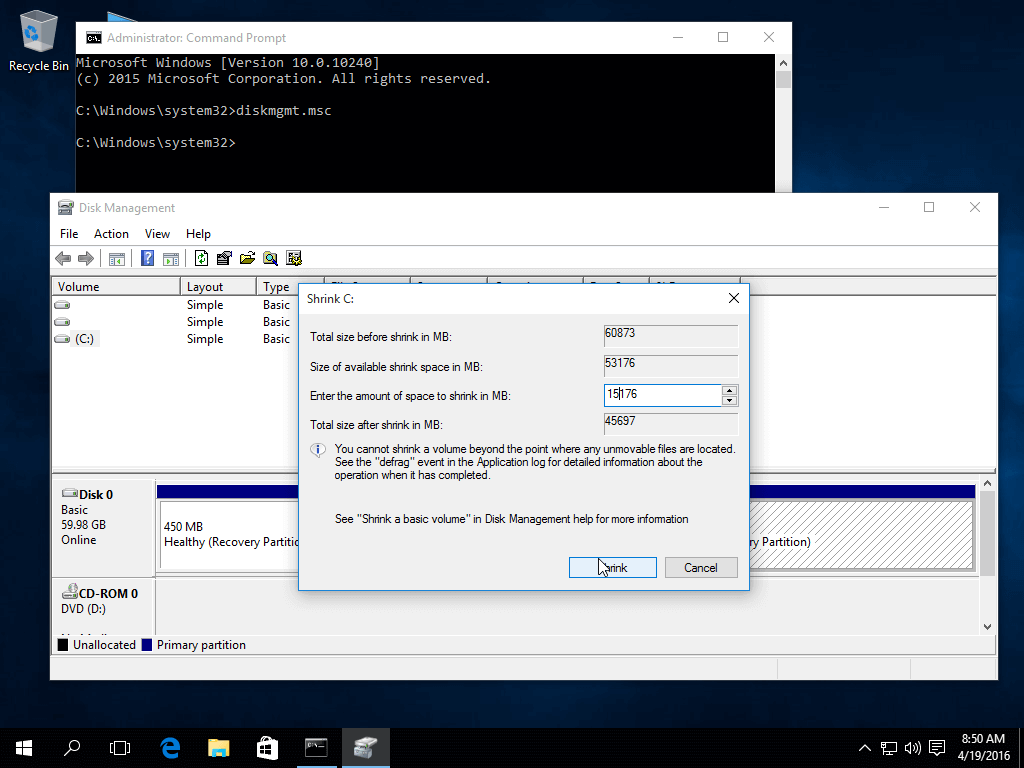
diskmgmt.msc on prompt and the Disk Management utility should open. From here, right click on C: partition and select Shrink Volume in order to resize the partition. C:\Windows\system32\>diskmgmt.msc3. On Shrink
C: enter a value on space to shrink in MB (use at least 20000 MB depending on the C: partition size) and hit Shrink
to start partition resize as illustrated below (the value of space
shrink from below image is lower and only used for demonstration
purposes). Once the space has been resized you will see a new unallocated space on the hard drive. Leave it as default and reboot the computer in order to proceed with Ubuntu 16.04 installation.
Step 2: Install Ubuntu 16.04 with Windows Dual-Boot
4. Now it’s time to install Ubuntu 16.04. Go the download link from the topic description and grab Ubuntu Desktop 16.04 ISO image.Burn the image to a DVD or create a bootable USB stick using a utility such as Universal USB Installer (BIOS compatible) or Rufus (UEFI compatible).
Place the USB stick or DVD in the appropriate drive, reboot the machine and instruct the BIOS/UEFI to boot-up from the DVD/USB by pressing a special function key (usually F12, F10 or F2 depending on the vendor specifications).
Once the media boot-up a new grub screen should appear on your monitor. From the menu select Install Ubuntu and hit Enter to continue.
5. After the boot media finishes loading into RAM you will end-up with a completely functional Ubuntu system running in live-mode.
On the Launcher hit on the second icon from top, Install Ubuntu 16.04 LTS, and the installer utility will start. Choose the language you wish to perform the installation and click on Continue button to proceed further.
6. Next, leave both options from Preparing to Install Ubuntu unchecked and hit on Continue button again.
7. Now it’s time to select an Installation Type. You can choose to Install Ubuntu alongside Windows Boot Manager, option that will automatically take care of all the partition steps.
Use this option if you don’t require personalized partition scheme. In case you want a custom partition layout, check the Something else option and hit on Continue button to proceed further.
The option Erase disk and install Ubuntu should be avoided on dual-boot because is potentially dangerous and will wipe out your disk.
8. On this step we’ll create our custom partition layout for Ubuntu 16.04. On this guide will recommend that you create two partitions, one for
root and the other for home accounts data and no partition for swap (use a swap partition only if you have limited RAM resources or you use a fast SSD). To create the first partition, the
root partition, select the free space (the shrink space from Windows created earlier) and hit on the + icon below. On partition settings use the following configurations and hit OK to apply changes:- Size = at least 20000 MB
- Type for the new partition = Primary
- Location for the new partition = Beginning
- Use as = EXT4 journaling file system
- Mount point = /
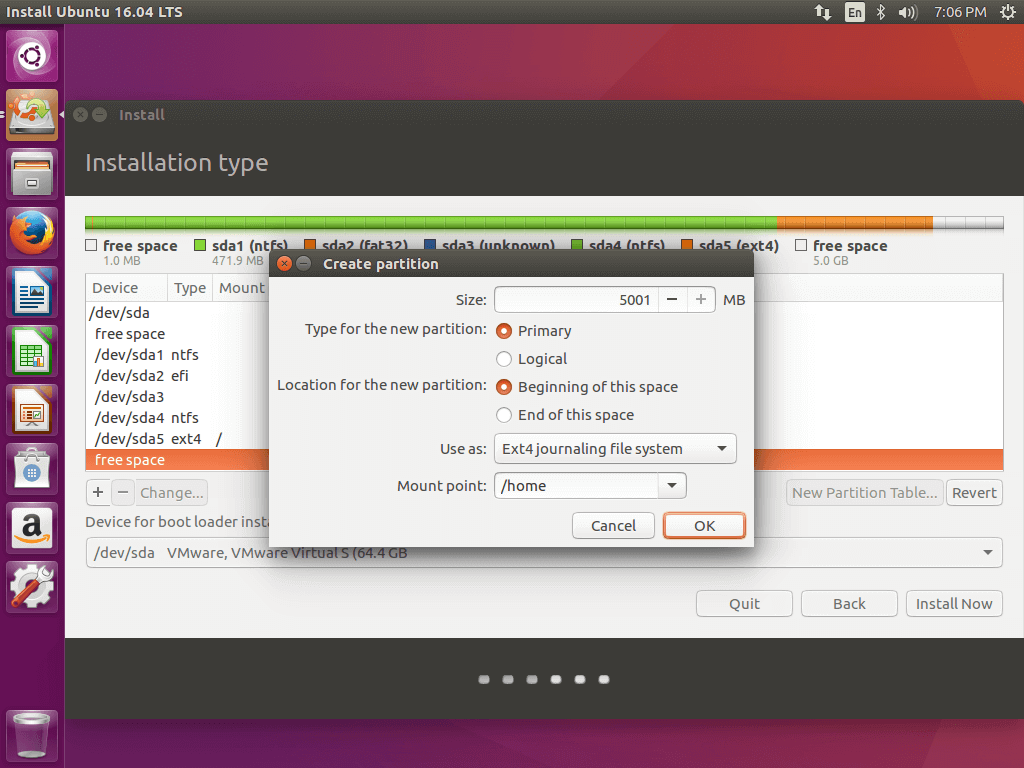
home partition using the same steps as above.
Use all the available free space left for home partition size. The
partition settings should look like this:- Size = all remaining free space
- Type for the new partition = Primary
- Location for the new partition = Beginning
- Use as = EXT4 journaling file system
- Mount point = /home
A pop-up window should appear to inform you about swap space. Ignore the alert by pressing on Continue button.
Next a new pop-up window will ask you if you agree with committing changes to disk. Hit Continue to write changes to disk and the installation process will now start.
10. On the next screen adjust your machine physical location by selecting a city nearby from the map. When done hit Continue to move ahead.
11. Next, select your keyboard layout and click on Continue button.
12. Pick up a username and password for your administrative sudo account, enter a descriptive name for your computer and hit Continue to finalize the installation.
This are all the settings required for customizing Ubuntu 16.04 installation. From here on the installation process will run automatically until it reaches the end.
13. After the installation process reaches its end hit on Restart Now button in order to complete the installation.
The machine will reboot into the Grub menu, where for ten seconds, you will be presented to choose what OS you wish to use further: Ubuntu 16.04 or Microsoft Windows.
Ubuntu is designated as default OS to boot from. Thus, just press Enter key or wait for those 10 seconds timeout to drain.
14. After Ubuntu finishes loading, login with the credentials created during the installation process and enjoy it. Ubuntu 16.04 provides NTFS file system support automatically so you can access the files from Windows partitions just by clicking on the Windows volume.
That’s it! In case you need to switch back to Windows, just reboot the computer and select Windows from the Grub menu.
If you want to install some additional software packages and customize Ubuntu 16.04, then read our article Top 7 Things to Do After Ubuntu 16.04 Installation.

