23.12.15

5 Aplikasi Android Untuk Pengurusan Kewangan Dan Perbelanjaan Anda

Boleh dikatakan pada hari ini, kita membawa telefon pintar ke mana-mana jua. Perkara ini sekaligus menjadikan ia sebagai salah satu tempat baik untuk merekod pelbagai perkara, termasuk perbelanjaan harian anda.
Terdapat beberapa aplikasi menarik di pasaran pada hari ini yang memudahkan para pengguna mencatatkan perbelanjaan harian mereka, sekaligus memudahkan mereka memantau kewangan dan mengetahui pola perbelanjaan supaya mereka boleh lebih berjimat pada bulan-bulan akan datang.
Jadi, sekiranya anda merupakan pengguna Android, terdapat sejumlah aplikasi yang menawarkan sokongan untuk mencatatkan perbelanjaan, dan berikut merupakan antara aplikasi menarik yang diminati kami.
Toshl Finance
Toshl Finance BB10
Boleh dikatakan Toshl merupakan salah satu aplikasi memfokuskan kewangan dan perbelanjaan yang popular. Ini kerana ia terdapat dipelbagai platform utama, termasuk di Android.
Menggunakan aplikasi ini, pengguna boleh mencatatkan pelbagai perbelanjaan harian mereka, sekaligus melihat baki wang mereka untuk sesuatu bulan.
Expense Manager
Expense Manager
Expense Manager merupakan salah satu aplikasi yang sedang digunakan oleh saya buat masa ini. Ia membawakan antaramuka yang kemas, disamping tidak diganggu oleh sebarang iklan.
Pengguna boleh menetapkan had perbelanjaan bulanan, dan mencatatkan pelbagai perbelanjaan mereka menggunakannya. Ia turut dilengkapi dengan notifikasi harian, membolehkan anda mencatatkan perbelanjaan anda tanpa terlupa menggunakannya.
Financius
Financius
Satu lagi aplikasi pengurusan perbelanjaan dengan antaramuka yang ringkas dan kemas. Menggunakan aplikasi ini, pengguna boleh mencatatkan perbelanjaan, selain mana turut membuat salinan pendua data perbelanjaan mereka terus ke Google Drive.
Spendee
Spendee Android
Spendee menawarkan kemudahan untuk pengguna mencatatkan sesuatu perbelanjaan dengan pantas, selain mana turut memperlihatkan graf dan infografik yang amat cantik untuk pengguna memantau perbelanjaan bulanan mereka.
Budget
Budget
Budget Android
Satu lagi aplikasi dengan antaramuka Holo yang selari dengan Android. Menggunakan aplikasi pengurusan kewangan ini, ia memberikan kemudahan untuk pengguna menetapkan perbelanjaan berulang – sekaligus memudahkan input pada masa akan datang.

Kebanyakkan daripada aplikasi pengurusan kewangan ini turut hadir dengan sokongan input dalam bentuk CSV untuk memudahkan anda memindahkan data ke perisian lain, ataupun menyimpannya untuk rekod anda di komputer dan sebagainya.
Apa pun, salah satu cabaran utama dalam menggunakan aplikasi ini adalah dimana pengguna sering kali terlupa untuk mencatatkan perbelanjaan mereka – sekaligus menjadikan angka perbelanjaan tidak begitu tepat apabila dihitung.
Bagi anda yang ingin menguruskan perbelanjaan dengan lebih efektif mungkin boleh mencubanya, dan jangan lupa berkongsi dengan kami sekiranya terdapat sebarang aplikasi pengurusan kewangan lain yang menarik untuk Android.

21.12.15

Cara Lain untuk Install Ubuntu alongside Window 10

Introduction

Windows 10 has been out for a while now and as I have a track record for writing dual boot guides I thought it was about time I created a Windows 10 and Ubuntu dual boot guide. 
This guide focuses on computers with a Unified Extensible Firmware Interface (UEFI) over a standard Basic Input Output System (BIOS). Another guide will be coming out shortly to cover the BIOS version.
What this means is that if you were using Windows 8 and 8.1 before upgrading to Windows 10 then this guide will work for you. If you have just bought a brand new Windows 10 machine and it has a standard hard drive (i.e it isn't a Surface Pro) then this guide will also work for you.
If your computer used to run Windows 7 before upgrading to Windows 10 then it is highly probable that this guide isn't suitable in which case you should follow this guide
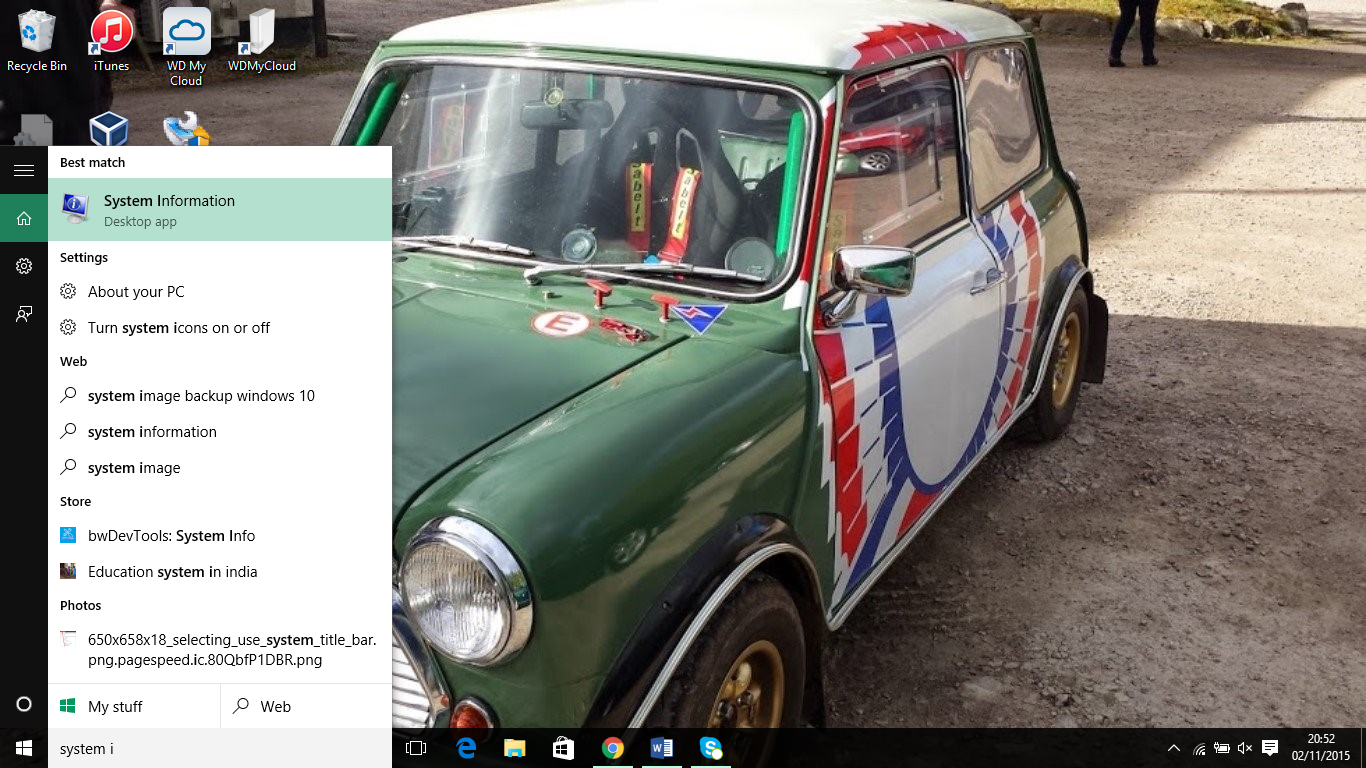
How can you tell if your computer has a UEFI over a standard BIOS? 
In the search box at the bottom of the screen type "System Information" and when the icon appears at the top click on it.
Halfway down the right panel there is an item called BIOS mode. If it says UEFI then this guide will work for you.

Steps For Dual Booting Windows 10 And Ubuntu

The steps required for dual booting Windows 10 and Ubuntu are as follows:

  • Backup your Windows 10 operating system (optional but highly recommended)
  • Create a Ubuntu USB drive
  • Enable booting from a USB drive
  • Shrink the Windows 10 partition to make space for Ubuntu
  • Boot into Ubuntu live environment and install Ubuntu
  • Amend the boot order to make sure Ubuntu can boot

Back Up Windows 10

In the list of steps above I have put this down as an optional requirement but I can't stress highly enough that you should really do it.
Let's imagine for a moment that you have a machine that used to run Windows 8 and you spent the time upgrading to Windows 10.
If you follow this process and for whatever reason it doesn't work and your machine is left in an undesirable state then without a backup the minimum it will cost you is the time it takes to reinstall Windows 8 and then upgrade to Windows 10.
Imagine now that you don't have the Windows 8 media and you don't have a viable recovery partition. You now have no way of getting Windows back without buying either the Windows 8 disk which costs around £90 or a Windows 10 disk which costs £199. You would also have to find and download any required graphics, audio and other drivers required for Windows to run properly.
I have written a guide (linked below) which shows you how to backup all of your partitions using a tool called Macrium Reflect. There is a free version of the tool available and the most this tutorial will cost you is time and if you don't have one an external hard drive or a spindle of blank DVDs.


Create A Ubuntu USB Drive

There are many tools out there for creating a Ubuntu USB drive including UNetbootin, Universal USB Creator, YUMI, Win32 Disk Imager and Rufus.
Personally the tool that I find most useful for creating Linux USB drives is Win32 Disk Imager. 
I have written a guide showing how to create a Ubuntu USB drive. 
It shows you how to do the following things:
  • How to get Win32 Disk Imager, 
  • How to install Win32 Disk Imager.
  • How to format a USB drive.
  • How to create a Ubuntu USB drive
  • How to set the power options in Windows 10 to allow booting from USB
  • How to boot into a Ubuntu live environment
You will obviously need a USB drive for this purpose.

Click here for a guide showing how to create a Ubuntu USB drive.


If you would prefer to, you can buy a USB drive with Ubuntu already installed on it.

Shrink Windows To Make Space For Ubuntu

If your computer only has one hard drive you will need to shrink your Windows 10 partition in order to make space for Ubuntu.

Click here for a guide showing how to shrink your Windows 10 partition.

Boot Into Ubuntu Live Environment

Make sure that the Ubuntu USB drive is plugged into the computer.
If you backed up your computer using Macrium and you chose to create the Macrium boot menu option then you can simply reboot your computer. 

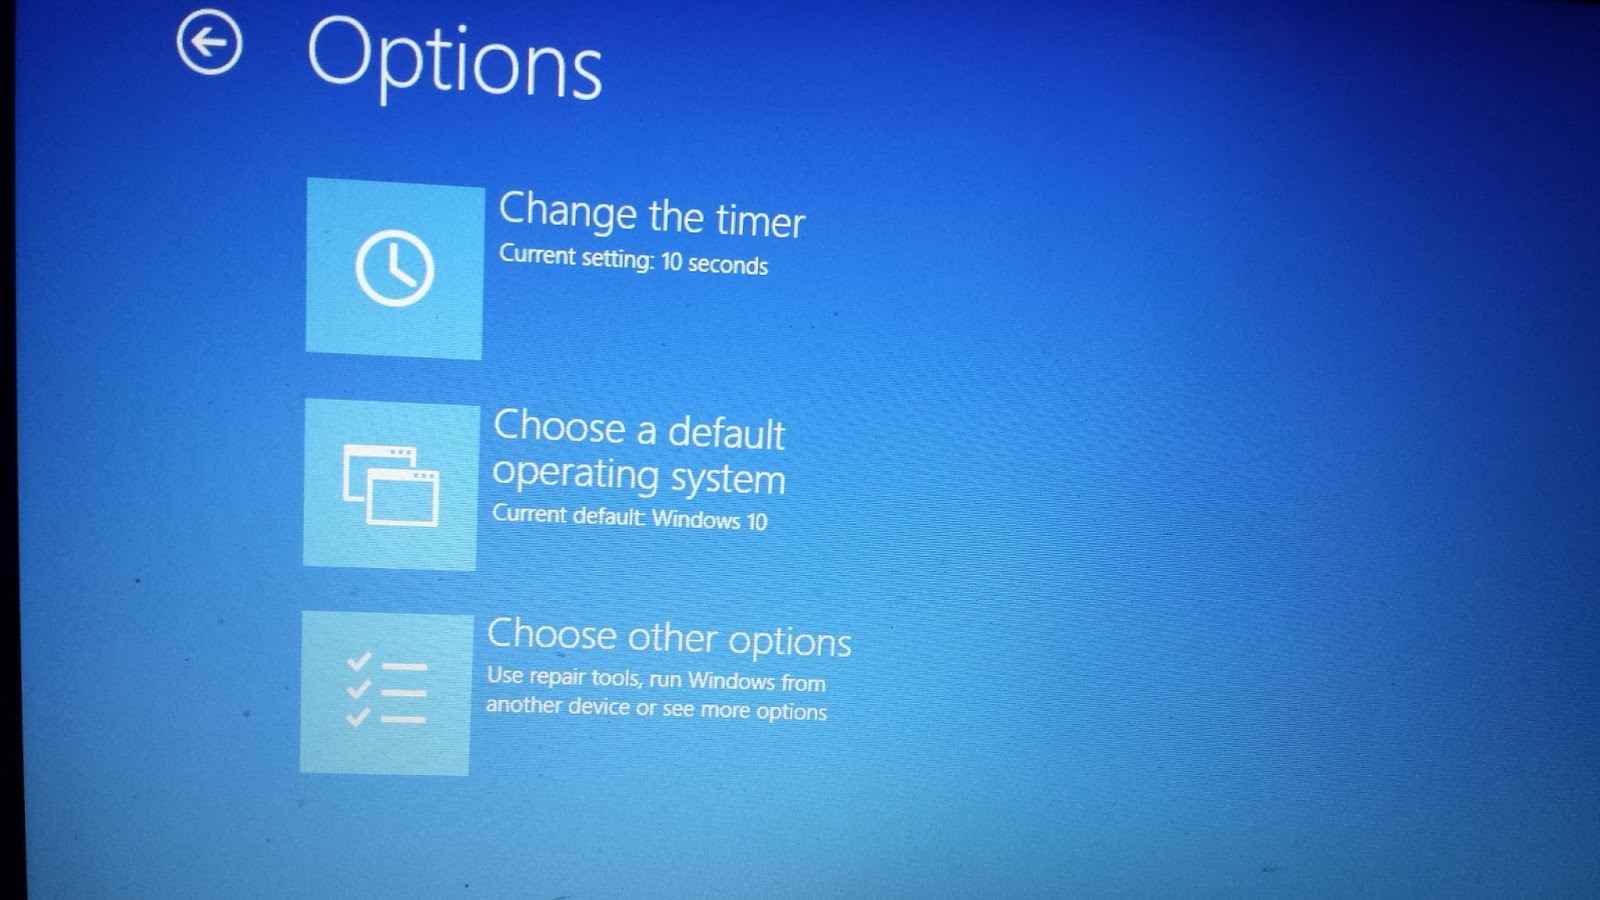
When the above screen appears click on the "Change defaults or choose other options" link at the bottom of the screen.

If you chose not to create the Macrium boot menu option hold down the shift key and reboot your computer. (Keep the shift key held down until a screen similar to the one below appears).


Each manufacturer has a different version of UEFI and so the menu options may be different.

The important thing is that a blue screen with white writing appears.

You are basically looking for the option to boot from the USB drive and this may take some finding. From the image above I chose the “Choose other options” menu item which produced the screen below.


I then clicked on the “Use a device” option which as you can see has the subtext “Use a USB drive, network connection or Windows recovery DVD”.


A list of devices will now appear.

This isn’t the first time I have installed things on this computer and my EFI partition still has links to old Ubuntu versions.

The important link on this screen is the “EFI USB Device” option.

Choose the EFI USB Device option and Ubuntu should now boot from the USB drive.

A boot menu will appear.

Choose the first menu option to try Ubuntu.

A large dialogue window will appear with options to install Ubuntu or to Try Ubuntu.

Click on the “Try Ubuntu” option. Ubuntu will now be loaded as a live session. You can try out all of the features of Ubuntu but if you reboot all the changes will be lost.

Install Ubuntu

To start the installation click on the “Install Ubuntu” icon on the desktop.
After clicking on the “Install Ubuntu” option the following screen will appear:
This is the beginning of the installation process and you can select the language which is used to help you through the process.

Choose your language and click “Continue”.


You now have the option to connect to the internet (Unless you are on a wired connection in which case it will be automatically connected).
It isn’t necessary to be connected to the internet when installing Ubuntu and if you have a poor internet connection (i.e. slow) then I recommend not connecting as this will slow down the process.
The advantages of being connected to the internet are that any updates that are available will be instantly applied and you will be able to install third party tools for playing MP3 audio as part of the installation process.
It is up to you whether you connect or not. To do so choose a wireless network and enter the security key.
Click “Continue”.


The next screen shows you a list of prerequisites for installing Ubuntu with ticks next to each one that has been satisfied.
The only one that really matters is the disk space. As mentioned during the shrinking of Windows phase you need at least 7 gigabytes of space but more is recommended.
Being connected to the internet is only necessary for installing updates on the fly and installing the third party software for playing MP3 audio and Flash. (These can be done at a later point).
The power source option is obviously required for a desktop computer but for a laptop if you have enough battery life you don’t need it to be plugged into the wall. (Although if you are close to one it is recommended).
At the bottom of the screen is an option to tick a box for installing third party software which allows you to play MP3 audio and play Flash video. There is a better option which can be installed post installation so leave this box unchecked.
Click “Continue”.


The “Installation Type” screen lets you decide whether you want to install Ubuntu alongside Windows or over the top.
Choose the “Install Ubuntu alongside Windows Boot Manager” option.
Click “Install Now”.
A window will appear showing you what is going to happen to your disk. By default the Ubuntu installer will create an ext4 partition for Ubuntu and all of your personal files and a swap partition used for swapping idle processes when memory gets low.
Click “Continue”.


A map of the world will appear. The purpose of it is to make it possible for Ubuntu to set the time on your clock correctly.
Click where you live on the map or start typing it into the box provided and then click “Continue”.


Almost there. Just two more steps before Ubuntu is installed.
You now need to choose your keyboard layout. Select your keyboard’s language in the left pane and then the actual physical layout in the right pane.
Alternatively click on the detect keyboard layout option and it will more than likely do it for you.
Test out the keyboard layout that you have chosen by typing into the box provided. Specifically try out symbols such as the dollar sign, pound symbol, hash tags, speech marks, slashes and other special characters as these are the keys that tend to move around on a keyboard.
Click “Continue”.


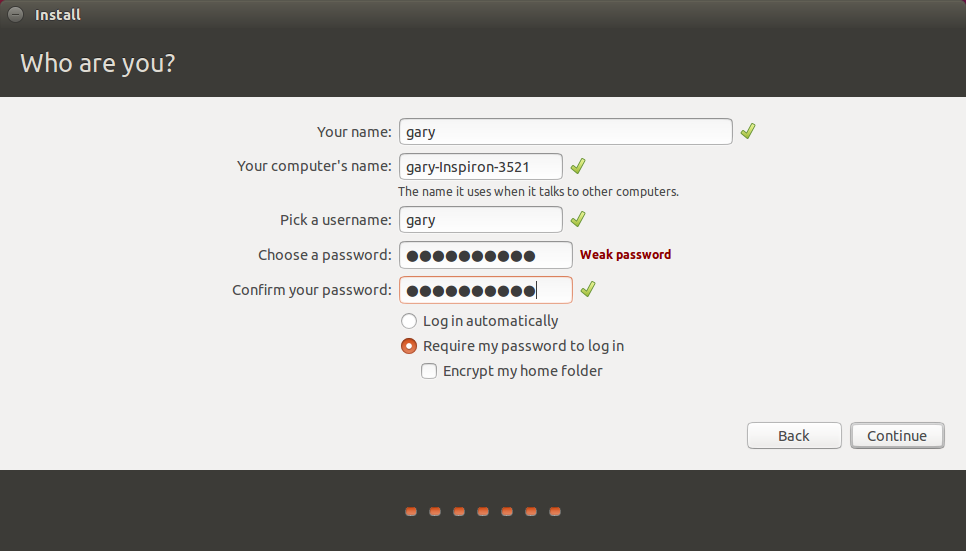
The final step is to create a default user.
Enter your name and give your computer a name.
Enter a username into the box provided and choose a password and repeat it.
Click on the “Require my password to log in” option. I don’t really recommend anyone letting their machine log in automatically unless it is a virtual machine used for test purposes.
Finally click “Continue”.
The files will now be copied to your computer.
When the process has finished you will have the options to continue test or to restart now. 
Choose the “Continue Testing” option.

Change The Boot Order So That Ubuntu Can Boot

You will need to be connected to the internet for this to work.
Click on the network icon in the top right corner and choose your wireless network (unless you are connected with an Ethernet cable). Enter the security key.
Open up a terminal window by either pressing CTRL ALT and T at the same time or click the top icon in the bar on the left side and type “term” into the search box.  Click on the terminal icon that appears.
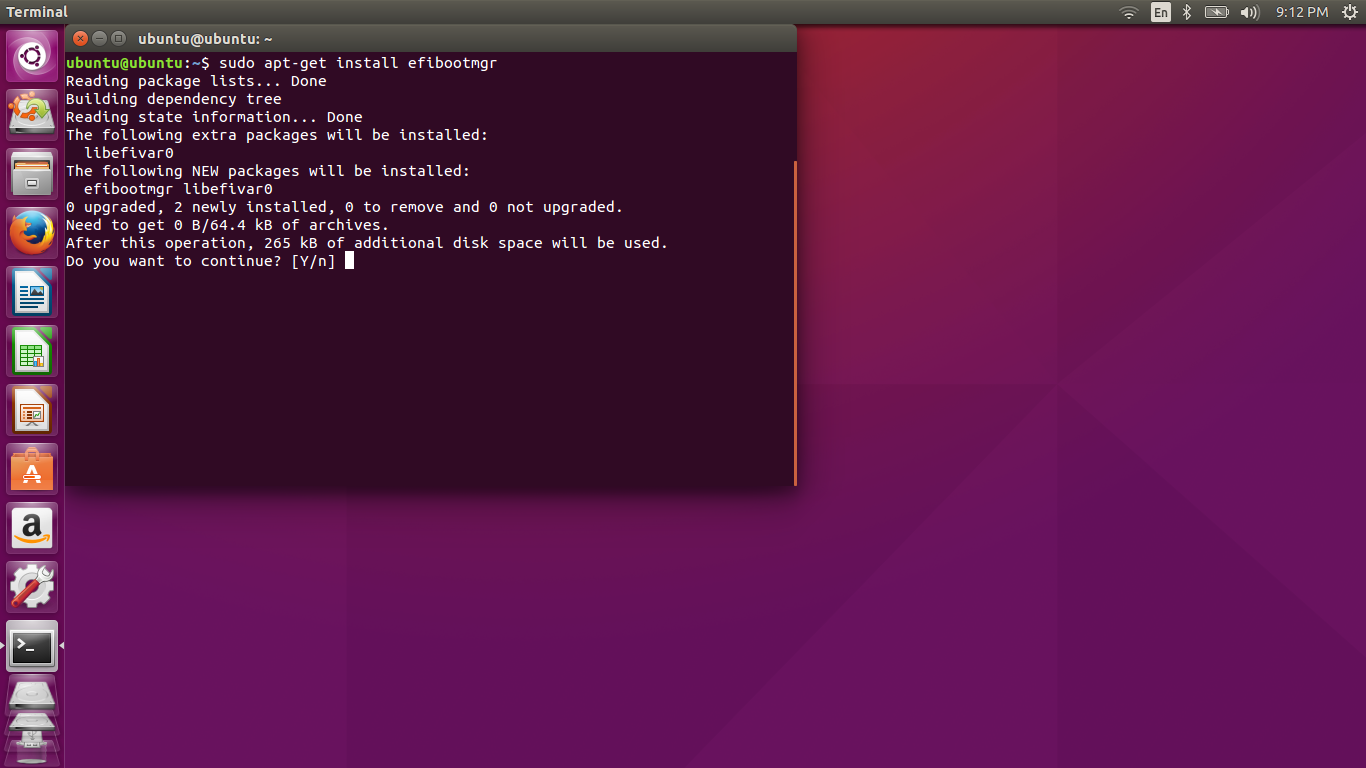
Type sudo apt-get install efibootmgr into the terminal window.
When asked whether you want to continue press “y”.
After the installation has completed type efibootmgr into the terminal window.
A list of boot devices will appear.
As you can see in my list there are the following boot options:
  • boot0000 for Ubuntu (this is an old version and can be ignored)
  • boot0001 which is Windows
  • boot0002 and boot0003 are two LAN devices
  • boot0004 which is the new version of Ubuntu that I just installed
  • boot0005 is my USB device
  • boot0006 and boot0007 are two other LAN devices
  • boot0008 is another USB device

At the top of the text you will see that my current boot device is boot0005 which is the USB device.
More importantly is the boot order which is listed as 0001,0000,0004,2001. 
What this tells me is that the computer will boot Windows first, then the rubbish version of Ubuntu, then the new version of Ubuntu and finally a USB device.
This is clearly incorrect.


To change the bootorder all you have to do is enter the following command:
·         sudo efibootmgr –o 4,1

The –o says that I want to change the order. Then all I have to do is list the order I want things to boot.
So in the command above I have stated I want Ubuntu to boot first and then Windows.
Type exit into the window and reboot the computer by clicking the icon in the top far right corner of the screen.
Choose to shutdown and reboot your computer.
When given the option and before the computer actually reboots remove the USB drive. 
Now when you restart your computer a menu will appear with options for booting into Ubuntu and Windows 10.
Try them both out and hopefully you will have successfully installed Ubuntu alongside Windows 10.

Bagaimana Install Ubuntu bersama windows 10

 
Dual-Boot Ubuntu 15.04/14.10 And Windows 10/8.1/8: Step By Step Tutorial With Screenshots
There are many of us want to use Windows and Ubuntu both at the same computer but dual booting does not seem easy to everyone. In this article I'll show you how you can dual boot your computer with Windows 10/8.1/8 and Ubuntu 15.04/14.10.


I assume that you've already installed Windows.

First of all save all of your important files so that any mishappening does not cause data loss. Save data either in pendrive or any external hardrive or whatever source you use to save your data just save it.

Now our first step starts with inserting Ubuntu bootable DVD/Pendrive. If you have pendrive then make sure you've set your system boot from Pendrive. If you have not set it up then open BIOS setup (Press Del while system startup). From BIOS, goto Boot tab and select boot preference and select your pendrive at primary boot. Now save settings and reboot your system (F4).

System should bootup from Ubuntu Bootable Pendrive. Just wait untill you get option to “Try Ubuntu” or “Install Ubuntu”.

Install Ubuntu Or Boot live ubuntu
Picture
Click Try Ubuntu and you will be booted to Ubuntu Live. Here you can test several features and look and decide further to install it or not. Now you see an icon on the desktop “Install Ubuntu”, click it.

A setup window will popup asking for language selection. Select your preferred language from left sidebar and click 'Continue'. The next screen shows couple of options to select. If you are connected to the internet, click the checkbox 'Download updates while installing'. This option downloads and installs all available updates (skip this step if you want to download & install updates after Ubuntu installation). Click second checkbox 'Install this third-party software'. This options installs third-party software such as codecs and more. Although you can install codecs after installing Ubuntu but if you install here then you can play everything just after installation is done. Now click Continue.

install linux ubuntu vivid vervet
Install Ubuntu 15.04 select language
Select your preferred language
Download & Install updates
It is the most important step. You have three options available first is 'Install Ubuntu alongside Windows' , second is 'Replace Windows with Ubuntu” and third option is “Something else”. If you want system to partition the hard-disk and install Ubuntu alongside Windows then select first option. If you want to remove Windows completely and install Ubuntu then choose second option and third option what we are going to select in this tutorial is “Something else”. This is the very convenient option. I can partition hard-disk as I want without removing Windows.

Choose 'Something else' and continue. The following screen would have all the partitions available at your disk, including the Windwos partition and free space. (Be very careful before you select any partition). Select free space and click '+' (plus) sign below left side of window. Now it's the main part but before that let me tell you what partitions are needed to install Ubuntu. We need to create minimum three partitions namely '/' (root), swap and /home.

Root '/'

root is the partition that contains all of your system and applications file. For example, when you install any application, the related files are stored into root partition. Nothing from this partition can be deleted without root user permission. root partition is symbolized as '/'.

root partition should be more than 25GB. This size will not cause trouble for you in future. You can easily install large applications.

Swap

swap is the partition that is used as RAM (Random Access Memory). In case your RAM is full, system will use swap as a RAM. swap is also used when user hibernates the system. The hibernate session is saved in swap. swap size should be double the size of RAM but if your RAM is 8GB or more then keep swap 8GB. It's should be enough.

/home

/home is the partition that contains all users data. Like in Windows users have different partitions to store data and one partition has OS. /home is like the partitions that contains all users data, such as, documents, music, movies, games setup etc. You can specify any size for /home depending on your use. If you have large amount of files then make it large.

Now that we know what root '/', swap and /home partitions are, let's move on to the main step. First create root partition where we'll install our Ubuntu. Enter size in MB (1024MB = 1GB). Click 'Primary' and click 'Begining of this space'. Choosing Begining of this space creates this partition first and rest of other after. From drop down choose 'Ext4 journalising file system'. There are couple of other filesystems but Ext4 is faster and work perfectly fine with Linux. In last, choose Mount point as '/' root from drop-down menu. And click 'OK'. You've created root partition.  
create root partition to install Ubuntu
Create the last '/home' partition in the same way as above partitions were created. Select free space and click '+' sign and enter size of /home partition. Jump to 'Use as' and select 'Ext4 journalizing file system, select 'Mount point' as /home and click OK. You're all done!

Click continue and it will give last prompt to check if all the partitions are okey. Click Continue if everything is fine. 
create swap partition to install ubuntu
Select rest of the free space again and click '+' (plus) sign. You'll get the partition creation window. Enter the size for swap and and select rest of the options and select 'swap area' from use as drop-down menu. This selection will hide the last option 'Mount point'. Click OK and you're done.

confirm/create partitions to install ubuntu
If you followed everything correctly you should get to select Time Zone. Select Time Zone and continue.
Select Keyboard layout and click Continue.

Complete all fields in the next window. Your name, You computer's name, username, password (twice) and select if you want to login automatically or require to enter password to login. Click Continue and istallation will start. It should not take much time. Just 5 minutes or so. If you're downloading updates then this may take more time depending on your internet speed. If you want to skip downloading, expand the status bar and click 'skip' multiple times.

When installation is completed you'll get popup to restart Live Ubuntu to Ubuntu or Continue Testing. Click Restart and you're all done. Plug-out Pendrive or eject DVD and now whenever you boot, the grub menu will give you two operating systems to select, Windows and Ubuntu. Select Ubuntu and you are done.


Congratulation! You now have two operating systems installed. Select anyone from grub menu and work without any problem.

Please take this poll!

27.7.15

Konsep Rahmat Seluruh Alam....

Sedutan daripada siri slot di 10 akhir bulan Ramadhan...

Rahmat adalah jalan kebaikan sehinggakan Imam Nawawi menyediakan satu bab khusus untuk menceritakan konsep kebaikan dalam riyatus Solihin.

Rahmat adalah tugas para Rasul dan Salafussoleh. Perkataan Rahmat disebutkan sebanyak 79 kali di dalam Quran. Disebut 35 kali secara gabungan perkataan dgn perkataan lain.

Perkataan Arrahman disebut sebanyak 77 kali... perkataan arrahiim disebut 131 kali dalam quran manakala perkataan irham disebut 5 kali.

Ada 100 ayat atau lebih yang menyebut tema rahmat. Manakala melebihi 500 kali ayat alQuran menyebutnya secara tidak langsung yang memberi maksud rahmat.

Rahmat ini seolah olah merupakan tema ke 2 di dalam Quran.

Banyak kisah yang membicarakan bagaimana Rasulullah menggunakan konsep rahmat dalam kehidupannya.

Kisah 1 berkaitan Zaid bin Haarithah... 
seorang hamba yang masuk Islam dan dimuliakan oleh Rasulullah.

Zaid bin Haarithah pada usia 5 tahun telah diculik di kampungnya lalu dijual kepada seorang lelaki yang bernama hakim.  Hakim pula menjualnya kepada Syaidatina Khadijah tatkala umur Zaid dalam lingkungan 8 tahun. Khadijah membeli Zaid kerana tertarik dengan akhlaknya yang mulia. Zaid berkhidmat di rumah Khadijah sehinggalah Khadijah berkahwin dengan Rasulullah dan Zaid memeluk Islam dan bersama sama dengan Rasulullah.


Ayah Zaid bernama Haarithah mencari cari anaknya sejak kehilangan Zaid sampai beliau menuis satu sajak indah khas untuk Zaid yang menceritakan penderitaannya mencari Zaid.

Bila bertemu Zaid bersama Rasulullah, Maka berlakulah perbicangan panjang antara beliau, Rasulullah dan Zaid. Di antara pilihan untuk bersama Rasulullah atau Zaid pulang ke kampung halaman bersama Ayahnya... akhirnya Zaid membuat keputusan untuk bersama RAsulullah kerana sayang dan cintanya kepada akhlak mulia lagi terpuji yang ada pada RAsulullah.

Ayah Zaid terasa sangat kecewa lalu Rasulullah mengembirakan hati Ayah Zaid dengan konsep Rahmat iaitu mengisytiharkan Zaid sebagai anaknya (pada waktu itu syariat Islam belum dilaksanakan lagi). Haarithah sangat gembira kerana anaknya bukan lagi berstatus hamba tetapi anak kepada Rasulullah.

Kisah ke 2..
Batu Hajar Aswad diletakkan semula ditempatnya oleh Rasulullah sehingga pergaduhan kaum ditamatkan.

Kebijaksaan Rasulullahmenggunakan konsep rahmat iaitu mengambil kain dan hajar asad diletakkan di ata skain. Rasulullah memanggil wakil daripada 4 kaum yang bergaduh itu memegang setiap bucu kain lalu membawanya ke tempat asal hajar aswad. Akhirnya Rasulullah yeng meletakkan sendiri batu itu dgn persetujuan bersama yang lain.

Kisah ke 3,

Kisah umat Islam berhijrah ke Habsah dari Mekah.

Jaafar Abi Talib menceritakan konsep rahmat dalam Islam apabila ditanya oleh Raja Najashi tentang keadaan mereka sebelum dan selepas memeluk Islam.

Kata Jaafar Abi Talib,

Sebelum memeluk Islam, kami adalah jahil, makan bangkai, mudah bergaduh, tiada sifat kejiranan dan penggemar arak dan penzinaan.

Tetapi selepas masuk Islam, kami bercakap benar, memuliakan jiran, menjauhi pergaduhan, meninggalkan amalan minum arak dan perzinaan, menjadi manusia yang mengabdikan diri kepada pencipta dan membebaskan diri drpd menghambakan diri kepada manusia.

Rahmat Dalam Keluarga
1. Lelaki atau suami adalah tonggak nafkah keluarga.
2. Lelaki atau suami tetap wajib membayar nafkah walaupun bergaji kecil. Pada waktu begini isteri yang suka rela membantu suami meringankan beban keluarga adalah yang terbaik tetapi bukan wajib atau boleh dipaksa.
3. Suami wajib memastikan anak-anak dan isteri memakai pakaian yang mematuhi syariat Islam.
4. Pendidikan ilmu kepada ahli keluarga termasuk akhlak dan adab menjadi tanggungjawab. Bantuan isteri adalah satu kelebihan.

CARA mendapatkan Rahmat.

1. Tawaddu
Merendahkan diri dari sudut imej diri, bahasa yang digunakan, body language yang terpancar dari diri.

2. Lemah lembut

Hadis nabi ada menyebutka bahawa Allah menjadikan diri Rasulullah sebagai seorangberjiwa hamba dan pemudah dan Allah tidak menjadikan Rasulullah Jabbar Anida.. keras dan kasar.

Hadis kedua menceritakan tentang tiada perkara yang ada kelembutan melainkan ianya meningkatkan kualiti seseorang.

3. Bertolak ansur

Hadis menyebut bahawa seseorang itu tidak dirahmati jika sekiranya dia tidak merahmati orang lain.

HAdis juga ada menyebut bahawa adalah rugi atau celaka seseorang yanag tiada sifat rahmat dalam hatinya.

Sifat Rahmat, kelembutan dan bertolak ansur adalah merupakan satu magnet kuat yang mampu menatik hati hati manusia ke arahnya tak kira hati orang muslim atau tidak.

4. Sentiasa berinteraksi dengan alQuran itu
a) tilawah atau membaca al Quran setiap hari.
b) Memahami kandungan alQuran melalui terjemahan dan tafsiran.
c) Tadabbur iaitu merenung dan memikirkan makna makna ayat alQuran.
d) Amalan, mengamalkan kandungan alQuran mengikut kemampuan yang ada bermula dengan diri sendiri dan kemudian mengajak orang terdekat serta orang yang jauh.

Oleh itu sebarkan rahmat dan kerahmatan  dalam'

1. Kepimpinan dan kepemimpinan
2. Ekonomi dan muamalat islam
3. Sistem kehakiman dan keadilan
4. Infrastruktur organisasi dan negara
5. Sistem pencukaian

Dan pebagai polisi individu, organisasi dan negara...

Jadikan agen penyebar Rahmat untuk seluruh Alam...

Amiin!


24.7.15

How to Change the Registered PC Owner in Any Version of Windows

If you’ve ever wondered how to change the name of the person that Windows is registered to, this is the quick tip for you. It’s not all that useful, but it might come in handy if you got a computer from somebody else.
Open up regedit.exe through the start menu search box or by pressing WIN + R to open the Run box and typing it there, and then locate the following registry key:
HKEY_LOCAL_MACHINE\SOFTWARE\Microsoft\Windows NT\CurrentVersion
image
RELATED ARTICLE
Change Your Computer Name in Windows 7, 8, or 10
If you’ve ever bought a new computer with the operating system already installed, you might be annoyed by the default... [Read Article]
Now you can find the RegisteredOwner and RegisteredOrganization keys in the right-hand pane. Change them to whatever values you want.
To show off the new changes, just type winver.exe into the start menu search box or WIN + R run box to see the About Windows box:

Kinda useless, but one of those things I have to write about if I want to cover everything :)
This should work in all versions of Windows, including Windows 7 and Windows 8.

29.6.15

[Tutorial] How to bypass Broadband limit 3 *Updated from 2

Lets face it, you CAN'T.

I know, I know.. I did write an entry before on how to bypass your broadband limit using a CMD 'ping' command. Well, it did work at that time.. Its true. I used it myself back then. But time changes, and for your ISP company's policy its doubly so. The thing is, nowadays whenever you hit the bandwith cap, they will just simply cut off your internet line until you make a payment to increase the bandwith for the month (or for the day) depends on which service provider that you choose.

But with the recent event of internet censorship, website banning, people jailing, and more.. hey, there's a case where a person got jailed just because he posted something in his facebook saying something bad about the police force. In his facebook! I mean, who could've seen his post other than his friends and peers? Well apparently the government is watching your post too. So, try not to tell everyone how big is your shit in the can every morning. The government keeps track on your shit, you know.

Click on Read more to see the tutorial.


However, I'm a man that believe in freedom of speech, democracy.. and all of that stuff. So yes, let see if there any tips and tricks left for us to use to maximize our broadband speed and use it to watch some porn.
Seriously, you better watch some porn instead of informative or political video in the Youtube. Discussing or debating about one country's military hardware and political issues could get you branded as enemy of the state and jailed for being an ungrateful yet well educated traitor rat bastard.

Now the 'ping of death' trick no longer work, because by now the ISP company already figured out how to deal with it. They simply forgo the maintenance of their signal towers altogether, causing your broadband signal to deteriorate in time of usage making the connection disconnected at random interval, hence the ping failed to maintain a constant connection. Apparently its very effective, because due to the users were able to increase the quality of their own internet connection, the ISP company decided that they no longer needed to upgrade their services, ever.

Another trick, was using proxy and changing DNS server. Using proxy have its own downside. Because you are using someone else connection, it could cause that whoever generous enough to give you his proxy, to access your internet browsing history and and intercepting sensitive information that you send across the network. Using the DNS protocol only works if you know the inside info which highly unlikely for the public to know. You can use OpenDNS, but it a public DNS so everyone else would be using the same fast DNS which in turn makes it slow back again..

And.. there is one more. Using the VPN (Virtual Private Network). There is alot of VPN out there, and not all actually allows you to bypass the broadband limit. Yes, VPN only speed up your internet connection with an extra security from being intercepted by anonymous user or tracked by the government or something.. Also, it allows you to access any website that is censored by the government or blocked by your ISP. From my understanding, the broadband limit is still there, because you know, you still logged to your ISP broadband.
When they say unlimited, what they mean is that you can access, download and upload anything that you want without being restricted. That is all to it.. If there is a VPN that allow you to bypass the broadband quota, it would be illegal, and a sweet sweet... sweet crime.. Of course I'm not telling you that. Cough cough..

Hey, its a new world now.
Sharing... can get you jailed!

[Tutorial] How to bypass broadband limit 2

As we all now.. most ISP provider nowadays have put a limit for broadband bandwidth onto their customer. The most obvious one is Celcom Broadband. Because.. they send a message saying that they going to do so. And not just that. The subsequent offer for sales that comes later started to show a table of limitation or restriction for user to download/upload per month.


This is actually not a new issue. It have been around since last year. It just that.. now I'm feeling like sharing a tutorial. Haha. 


For a product that you spends money on, it is a bad idea to be restricted on its usage. Especially when you need an unlimited access to it. Customers usually complains that if the new restriction are to be imposed, why not reduce the subscription prices? For those who feel cheated and treated unfairly, you don't have to worry. There is a sinister but yet a simple way to breach the broadband limit imposed by the ISP provider. With that being said, be warned. Do this on your own risk..


Click on Read more to see the tutorial.


What are we going to here is that we going to do something called the "Ping of Death". Ping of Death involves of sending packet data at the size of 32 Bytes. 
I'm not going through the technical stuff here but basically Ping of Death is some kind of...... Cookie Monster! 
Ok I'm just joking. Ping of Death is actually can be a basic denial-of-service attack. Let just say that as long as that you won't try to sent packet data more than the size of 32 Bytes, you basically just saying hello to the other computer. 


Ping of Death that I'm gonna show here is a type of ping-flooding. Where we going to flood the server with so much ping traffic, the server won't be able to keep up and the normal traffic would not be able to reach up the system. It would look that your IP address and internet connection are resetting to the system. Therefore, the system would fail to register the real usage of your bandwidth. Also, its helps you to stay connected. How so? Here so: 


1. Click on 'Start' and search for 'Command Prompt' program. For Vista, it can easily be recognized like this:


If you are not using Vista, you can go to click on Start> Run> and type CMD in the box and click 'OK'. You'll get something like this:


2. Next, after you got to the 'Command Prompt' window.. Type in: 'ipconfig' or 'ipconfig/all'. It something like this:


3. Then you'll get something like this:


The value that we are looking here is the IP address that we are using. For our internet connection of course. I've highlighted the part what we need, its the IPv4 Address and nothing else. I've censored my IP address because.. its not good for your health. Haha


4. If you are using USB based modem, you'll need to fine the name of your modem such Huawei, Alcatec or Vofaphone, instead of Local Area Network. You'll get an IP address, e.g 10.174.175.233, something like that. This is a normal IP address for phone-line broadband like Celcom. Now remember, its the IP on IPv4 Address only. Or it could be just the IP Address, depends on your hardware.

After you got the IP address, what you need to do is ping the IP. Type in: 'ping [the IP address that you just got] -t' ,without the bracket. It would like something like this:


5. And.... thats it. You just let it run as long as you online, and you'll get unlimited usage of the internet bandwidth. And it helps you stay connected because you keep pinging the IP.


Oh yea, another way to make the subsequent 'Ping of Death' much easier.. you can create a looping program yourself. 


Open up a notepad, and use the information that you just retrieve from the Command Prompt. Type in:


ping [the IP addresss that you got from the Command Prompt]
connections

Type the command without the bracket and save the file as Connections.bat. And.... That it. You can put the file on desktop and keep clicking it everytime you reached your broadband limits. Easy.

Notice that the last picture above, if you are successful in pinging the IP address, it would bring out such notice, 'Reply from .... :bytes=32 and so on' and it should be keep on repeating until it pinged to death.

Lastly, do this on your own risk. Comment below if you have other suggestion or having problem, except if you got banned by Celcom.. that, I cannot help. Peace